Saturday, July 28, 2012

22-07-2012: Third trip.

Today I sailed south and passed the small harbour of Hou. (55.912149,10.260522)
A 8.4 km trip.
Check out my video of the trip (2.48 min)


After using the kayak there are only a few things I need to do different:
1) 
The gaskets for the hatched are not completely water tight. I need to figure out what to do...
2) 
The skeg has a problem with sand. When starting from a sandy shore the sand jams the skegs movement.
3) 
I need to construct a decent support for my back. Right now a have a make-do support made of foam. 

19-07-2012: First time sailing.

Ready for my first trip in my new kayak. I have just bought a new spray skirt and it fists perfectly. The weather is fantastic and I have my phone as GPS (in two plastic bags), water and my camera.

Ready to go.

The feeling when silently sliding through the water is fantastic, and I am really pleased with the feel of the kayak. I sailed 5 km north and then back again.
On the way back I passed a couple sitting on a pier with their feet in the water and the man said: "what a beautiful kayak you have there"..


18-07-2012: In the water.

New roof bars and the kayak tied securely in place.


The kayak "Havhingsten" ("The Sea Stallion") in the water for the first time. This calls for a cup of beer...


And "YES" it sails like a dream.


17-07-2012: Rigging out.

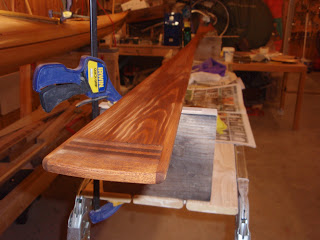
The paddle have had several coats of "Danish Oil" (linseed oil), but I am not really happe with the result. So I have given the paddle two coats of varnish as well.

To bind the bungee cord on the deck together I have used alu wire locks and then covered these with shrinkable tubing.


The front deck.

The 3. coat of varnish was not a succes: Wrinkles. But I will deal with that later.

Placing a rubber gasket at the hatches.


16-07-2012: Varnishing

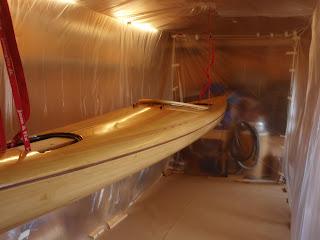
2 coats of varnish and looking good... I am using the Hempel Classic varnish. I have suspended the kayak from the ceiling in order to coat the whole kayak in one step .

For the 3. coat I build a cabin inside my garage in order to try to keep it as dust free as possible.


This worked OK with regards to dust, but this 3. coat was really bad. Runnings and wrinkles... 
But never mind. Now I am determined to go sailing. I will have to fix that later...

15-06-2012: Details on the kayak.

Today I glued the paddle  holder in place. I have made a mockup to hold the pieces in place while gluing.


 The cheek plates are ready and glued in place reinforced with fiberglass.


The paddle are almost done now. Just need some color and surface treatment.

 The middle of the paddle is marked with a band of dark wood.

I have stained the wood with a alcohol based stain.


09-06-2012: Greenland style paddle III:

In the process of sanding the paddle. It takes a lot of sanding.


The shape is about Ok now.

04-06-2012: Greenland style paddle II:

Just glued the end pieces in place. The outermost piece of wood is some kind of hard dark wood I had laying around.


Ooops: When sanding the second piece of wood for the other tip I made a mistake. I got the angles wrong....

 Just testing the weight of the paddle: 


2870g. Hopefully the weight will reduce greatly when sanded to the right shape..


The name inlay is looking good..

Started to sand the paddle in shape with my belt sander.

03-06-2012: A Greenland style paddle.

I am growing increasingly impatient. I want to go sailing... While waiting I decided to make a greenland style paddle. 
Basically constructed of 4 pieces of wood and glued together.


02-06-2012: Reinforcing deck and hull (2. attempt)

Here I am placing a new fiberglass reinforcement. This time it is the same type of fiberglass as when fiberglassing the hull and deck.


Remaking the name inlay for the 4. time... Its almost becomming a routine to cut out the letters.


The name inlay taped down with nylon tape.